A Print Preview Program for Visual Basic |
排版過的 Word 檔 |
Mike Foley
If you'd like to talk to Mike Foley about his View Print routine, he'd like to hear from you. You can write to him at 1811 Apache Trail, Clearwater, Florida 24615. You can also call him at (813) 461-9382.
Print preview is one of the most useful features in Microsoft?Word for Windows™, Microsoft Excel, Microsoft Access? and FoxPro? Seeing a report onscreen before you print it saves you time and money, and it lets you refine your document without wasting paper. This article presents a program that lets you add a print preview feature to your Microsoft Visual Basic? reports. In addition, we'll discuss how to select printers and type styles by using the common dialog box.
The main program for our print preview utility is called VP, which stands for View Print. It's a stand-alone program you can shell to from any report. After VP lets you preview a report and select a printer, it shells to a small program named VP_Print to spool the report. We've included a sample report program to test the VP system. You can use all your screen and printer font styles with VP.
It's difficult to write reusable routines that display printed information either onscreen as a picture object or on the printer. Saving pages as bitmaps and printing them later is slow and diminishes print quality. Using PrintForm has its drawbacks, too, because the results look grainy and the page size is limited to the screen height. The VP system is designed to solve these problems for general text data presentation and to be small and reusable.
The VP system uses a temporary intermediate file that stores every print instruction for a report. The viewer routine and the print routine simply read each instruction to display the report on the appropriate object. A report program that uses the VP system will open a document file, fill it with information about each section of text, and shell to the VP program. VP will then read that document file and display it.
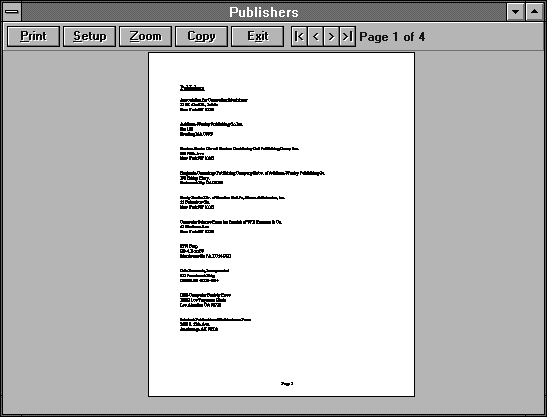
Figure 1 shows the VP system in action. When you click the Print button, the common dialog box allows you to specify the range of pages to print. The Setup button permits printer selection. When you click the Setup dialog box's OK button, VP will shell to the VP_Print program that rereads the document file and prints it. When VP closes, it erases the document file.
Figure 1. The View Print routine lets you preview your page layout before you print it.
VP is easy to use and understand. It's small and flexible—and it can handle multicolumn reports and reports with pages longer than the printer object. VP has some limitations you must consider before using it, however: VP requires that you create your reports by using the VP.MOD routines and that your reports be no longer than 218 pages. Unfortunately, the VP utility doesn't support graphic objects.
The document file is disk based and can become large, so disk space can be a problem with large reports. (As we mentioned, the document file is erased when VP ends.) You may wish to modify VP to print longer reports, to print pictures, or to offer other features.
VP sends every printer instruction to a file. The routine stores the document information—counters, font names, font sizes, current X and Y coordinates, and text—in a random access file. This file is a temporary file located in the \TEMP directory.
The VP program uses a rather unorthodox file structure—two typed variables that store data in the same file. (See "Creating Records That Have Multiple Personalities," in the February 1993 issue of Inside Visual Basic, for more information on this technique.) One typed variable, VP, contains information about each text segment: its font name and font size; whether it's bold, underlined, or italic; and whether the line ends with a line feed. The second typed variable, VPCounter, contains data about the number of pages, the starting and ending records of each page, and the page length. Listing 1 (found at the end of this article) contains the code for the file VP.MOD. If you examine these typed variables in the global declarations code section of VP.MOD, you'll see that they're of different byte sizes—VPCounter is eight times larger than VP.
VP writes records using the VP format to the document file, starting with the first record in the file. There's one record for each text segment. After it writes all the text segments, VP fills out the file with blank records and closes the file. Then, VP reopens the file, specifying the blocking factor size of Len(VPCounter), and writes the VPCounter record as a new last record. It's a tricky method, but it works.
All of this sounds rather complicated, but the calls in VP.MOD make file access easy. You never have to worry about writing or reading the document file, because VP.MOD automatically manages this process. The VP.MOD file contains all the routines to open a document file, fill it with text segments, close it, and shell to VP.EXE.
VP has scrollable picture boxes and a Zoom button. These are variations on techniques we discussed in the April 1992 issue of Inside Visual Basic. VP uses several other application programming interface (API) calls that are also detailed in past issues of this journal.
The VP system consists of two programs, VP and VP_Print. A third program, VP_Test, demonstrates the system by using the Data Control object and the \VB\BIBLIO.MDB database that comes with Visual Basic version 3.0. Each program uses VP.MOD, which is the heart of the system. The VP.BAS module simply contains private profile INI routines that are optional in report programs. VPTest doesn't have to use an INI file, but our example shows how to store common dialog box font information in an INI file. All three projects use Form1 as the startup form.
Projects that use VP may reside in any directory you choose (the project directory); however, you should store VP.EXE and VP_PRINT.EXE in the Windows directory so they'll be available to multiple applications. If you want to place the EXE programs elsewhere, you may need to change the code in the VPRun subroutine (see Listing 1, at the end of this article). Follow the instructions to change the remarks. You can store VP_Test in the project directory.
To create the project VP.MAK, start a new project with the name VP.MAK. Add the CMDIALOG.VBX and THREED.VBX files. Next, design Form1 with the controls shown in Figure 2, then set the form's control properties as listed in Tables 1 and 2. Panel is a Three-D SSPanel. All the buttons are Three-D command buttons located inside Panel. LP is a regular label control located inside Panel. After you place PicParent on the form, place PicVP and PicS within PicParent. Add the new modules VP.BAS and VP.MOD. Name the CommonDialog control on the form CD. Idle is a standard command button you use to keep the focus off other buttons. Enter the code from Listings 1, 2, and 3, found at the end of this article. Save VP.MAK and its form and modules to the project directory, then make an .EXE file of this project in the Windows directory.
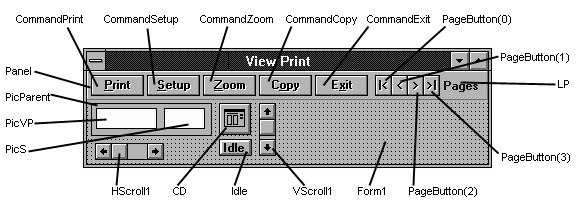
Figure 2. Create the VP form, then add and label the controls like this.
Table 1. Apply these controls and properties to VP.FRM.
| Name | Property | Setting | |
| Form1 | BackColor | Gray | |
| (&H00C0C0C0&) | |||
| Caption | View Print | ||
| Panel (Type: SSPanel) | Align | 1 (Align Top) | |
| AutoSize | True | ||
| BackColor | Gray (&H00C0C0C0&) | ||
| BevelInner | 2 - Raised | ||
| BevelOuter | 0 | ||
| BevelWidth | 1 | ||
| BorderWidth | 0 | ||
| Height | 435 | ||
| CommandPrint | Caption | ||
| CommandSetup | Caption | &Setup | |
| CommandZoom | Caption | &Zoom | |
| CommandCopy | Caption | C&opy | |
| CommandExit | Caption | E&xit | |
| PageButton( ) * | BevelWidth | 1 | |
| Caption | |<, <, >, >| | ||
| Enabled | False | ||
| Font3D | 3 | ||
| ForeColor | Blue (&H00C00000&) | ||
| Height | 315 | ||
| Index | 0, 1, 2, 3 | ||
| RoundedCorners | False | ||
| PicParent | AutoRedraw | True | |
| BackColor | Gray | ||
| PicVP | AutoRedraw | True | |
| PicS | AutoRedraw | True | |
| LP | AutoSize | True | |
| BackColor | Gray (&H00C0C0C0&) | ||
| Caption | Pages | ||
| ForeColor | Blue (&H00FF0000&) | ||
| VScroll1 | SmallChange | 100 | |
| HScroll1 | SmallChange | 100 | |
| Idle | Caption | Idle | |
| * PageButtons are in a control array indexed from 0 to 3. | |||
Table 2. These are the settings for all 3D buttons on VP.FRM.
| Property | Setting |
| Font3D | 3 |
| Height | 315 |
| RoundedCorners | False |
| Width (Wide buttons) | 795 |
| Width (Page buttons) | 255 |
When a Visual Basic program begins, the printer object is oriented to the printer specified in the WIN.INI file. The Setup button on VP.FRM will let you change printers, but because the printer setup dialog won't change the Printer.hDC in the program currently running (VP.EXE, in this case), it's necessary to shell to another program that will pick up the newly selected printer from WIN.INI. Therefore, you must create the VP_Print project to allow full printer selection. VP.EXE allows printer selection and VP_PRINT.EXE picks up that Printer.hDC and prints the report to it.
To create the VP_Print project file, start the new project and add the files CMDIALOG.VBX, THREED.VBX, VP.BAS, and VP.MOD. Create Form1 as shown in Figure 3; Table 3 lists the control properties. Add the code from Listing 4, found at the end of this article. Save VP_PRINT.MAK and its form and modules to the project directory. Make an .EXE file of this project in the Windows directory.
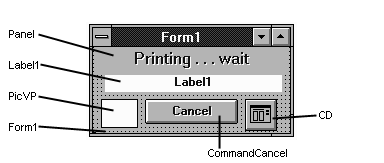
Figure 3. This is Form1 of VP_PRINT.MAK.
Table 3. These controls and properties belong to VP_PRINT.FRM.
| Name | Property | Setting |
| Form1 | BackColor | Gray (&H00C0C0C0&) |
| BorderStyle | 1 - Fixed Single | |
| ControlBox | False | |
| MaxButton | False | |
| MinButton | False | |
| Panel (SSPanel) | Alignment | 7 - Center - Middle |
| BevelInner | 0 - None | |
| BevelOuter | 0 - None | |
| Caption | Printing . . . wait | |
| FontBold | False | |
| FontSize | 12 | |
| ForeColor | Blue (&H00FF0000&) | |
| Label1 | Alignment | 2 - Center |
| ForeColor | Blue (&H00FF0000&) | |
| CommandCancel | Caption | Cancel |
| ForeColor | Blue (&H00FF0000&) | |
| PicVP | Visible | False |
To create the VP_Test project, make a new project and add the files CMDIALOG.VBX, VP.BAS, and VP.MOD. Design the form as shown in Figure 4, using the properties in Table 4. Index the Option1 buttons from 0 to 2. Set the Data1 field properties before setting the Label1 properties, and set Label1.DataSource before setting Label1.DataField. Be sure to place Frame1 on the form before the Option1 controls, and place the option buttons within the frame. All the command buttons use default settings—simply caption them as shown in Figure 4. Enter the code from Listing 5, found at the end of this article. You may test this program by running it while in Visual Basic. Save VP_TEST.MAK and its form and modules to the project directory. Make an .EXE file of this project in the project directory.
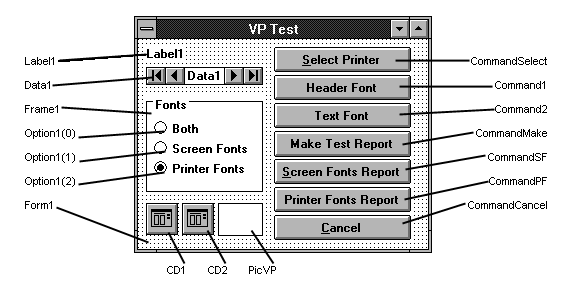
Figure 4. Create VP_TEST.FRM to look like this.
Table 4. Put these controls and property settings on VP_TEST.FRM.
| Name | Property | Setting |
| Data1 | DataBaseName | C:\VB\BIBLIO.MDB |
| RecordSource | Publishers | |
| Label1 | AutoSize | True |
| DataField | Company Name | |
| DataSource | Data1 | |
| Option1(0) | Index | 0 |
| Option1(1) | Index | 1 |
| Option1(2) | Index | 2 |
| PicVP | Visible | False |
Now it's time to try the VP system in your own application. The VP_Test project demonstrates the basic process, so if you subscribe to the Software Developer's Resource Disk or ZiffNet, you can follow along by opening the project.
Your report program must start with the statement Set MainForm = Me. Put this statement into the form's Load procedure. Use DocNew to open a document file. Format the data by setting the variables listed in Table 5. Describe the report format using the optional variables listed in Table 6. Use the PutVP routine to put the formatted text in the document file. DocFinish closes the document file. VPRun shells to VP.EXE and passes the document filename. To measure distances, use the TPI constant, which is equal to 1440 twips, or one inch of twips. The programming steps are as follows, in general terms:
Set MainForm = Me
Open a data file
DocNew ""                                ' Start new document file.
VPHeight = Printer.Height - TPI          ' optional
PageHeight = Printer.Height              ' optional
MeasureForScreen = True                  ' optional
FormFeed = False                         ' optional
VP.CY = TPI                              ' Start one inch from top.
VP.Text = "Report Header"                ' Specify header.
VP.FB True                               ' bold on
PutVP                                    ' Put in document file.
VP.FB = False                            ' bold off
Do While Not Eof(data file)              ' Loop through data.
 VP.Text = data.field1                   ' Place text into variable.
     PutVP                               ' Put in document file.
 VP.Text = data.field2
 PutVP

Loop
DocFinish Title + Format$(Now,"m/d/yy")  ' Close document file.
VPRun                                    ' Run the VP program.
Table 5. These are the VP system variables.
| Variable | Usage |
| VP.Text | A text segment; the actual text to print |
| VP.CY | Vertical location of the text segment in twips; same as CurrentY |
| VP.CX | Horizontal location of the text segment in twips; same as CurrentX |
| VP.FN | Font Name |
| VP.FS | Font Size |
| VP.FU | Font Underline |
| VP.FI | Font Italic |
| VP.NP | New page flag; set to true to force a new page after current text is displayed |
| VP.LF | Default = True; after printing, VP.TEXT VP will print a line feed—if False, it won't issue a line feed and VP.CX will be where printing stopped |
Table 6. The VP system also uses these variables.
| Variable | Usage |
| CurY | Use to set or read current vertical location |
| VPHeight | Optional—bottom margin or printable height measured from top of page; when print reaches this location, a new page is generated if FormFeed is True |
| PageHeight | Optional—will force a new page if VPHeight=0 and printing reaches this measurement; set to TPI * 7 for 7-inch form length; VP will display a page this size; if not set (=0), VP will size page to the actual printed area |
| VPCancel | If True, VPRun will stop processing and kill the document file |
| FormFeed | Default = True; set to False to control column length manually |
| MeasureForScreen | Default = False; sizing of text based on the printer's FontSize; if True, sizing of text based on the screen font size |
| VPWait | Set to True to stall report program while VP is running |
The VP_Test project uses all those steps. Examine the code in each subroutine to see exactly what arguments you may pass and what processing occurs. For instance, DocNew requires a string argument. If you pass an empty string ("") to DocNew, it creates a temporary file. If you pass DocNew a filename, the routine will use that name for the document file. DocFinish requires you to send it a title. That title will appear in the VP program caption.
PutVP measures text, puts a new record into the document file, checks the bottom margin (VPHeight), starts a new page if necessary, and resets some variables. You can override or reset any of the VP variables during processing to control the placement of text on a page.
Multicolumn reports aren't difficult to create; simply follow the steps in the CommandSF_Click() and CommandPF_Click() subroutines. To print multicolumn reports, you'll need to set the FormFeed variable to False and check for the end of each column, as in the ColPrint subroutine.
The main form must have on it a picture box named PicVP. (PicVP may be invisible.) VP uses PicVP to size text by using routines in VP.MOD. You must also place at least one CommonDialog control on the main form. VP_Test uses the CD1 and CD2 CommonDialog boxes to store two font settings.
The VP user-defined type has elements that are written to the document file as one record for each text segment. You can use these to describe the location and font style of text. Set these variables and use PutVP to store them in the document file.
Of course, there are many ways to write a program to view and print a report—this is just one of them. Advanced programmers may enjoy more elegant solutions, but for simplicity and getting the job done, VP offers control to the programmer. You may wish to modify VP, but if you change the size of the typed variable VP or VPCounter, be sure that VPCounter's size is some multiple of VP's size. Check these sizes in the debug window, as shown in Figure 5.

Figure 5. You can test the typed variable sizes like this.
Eventually, Microsoft may release a standard print preview driver for Visual Basic. Until that time, VP offers a good general-purpose solution.
Listing 1. VP.MOD
' NOTE!  Project form must:
'   Set MainForm = Me
'   have a picture box named PicVP
'   have a cmdialog control
' The picture box is used to measure text if MeasureForScreen = True.

Global Const VPVersion = " Version 1.1"
Global MainForm As Form     ' must be set by project
Global DocFile As String    ' document file name
Global VPRec As Integer     ' current record
Global VPF As Integer       ' VP file channel
Global VPCancel As Integer  ' set to cancel report
Global VPWait As Integer
Global Const TPI = 1440
Global MeasureForScreen As Integer ' This is normally false, so all
' fontsize measurements are based on the printer, but if it is True,
' measurements will be made based on the MainForm!PicVP picturebox.

' VB Text and font control variables
Type VPType
    CY As Integer     ' current Y position - 0 if not needed
    CX As Integer     ' current X position - same as left margin or start
                      ' of printing
    FN As String * 20 ' FontName
    FS As Single      ' Fontsize
    FB As Integer     ' FontBold
    FU As Integer     ' FontUnderline
    FI As Integer     ' FontItalic
    NP As Integer     ' New page
    LF As Integer     ' line feed - default true - 0 to stay on same
                      ' line after printing
    Text As String * 132    ' actual text
End Type
Global VP As VPType

' last record - automatically accumulated
Type VPCounterType
    Pages As Integer
    Width As Integer
    Title As String * 48
    VPHeight(1 To 218) As Integer
    FromRec(1 To 218) As Integer
    ToRec(1 To 218) As Integer
End Type
Global VPCounter As VPCounterType

Global CurY As Single
' current Y position on page

Global FormFeed As Integer
' Default true. Set to false to stop forced form feeds.

Global VPHeight As Integer
' Height of print area on page. Set if bottom margin is needed.
' New page will be forced if this is exceeded.

' If the page height must be fixed, then set this. Don't set if page can be
' shorter or longer than printer object page.
Global PageHeight As Integer

Declare Function VPTemp Lib "Kernel" Alias "GetTempFileName"
  (ByVal CDrive As  Integer, ByVal LpPrefix As String, ByVal wUnique
   As Integer, ByVal  lpTempFileName As String) As Integer
Declare Function WaitForVP Lib "Kernel" Alias "GetModuleUsage"
  (ByVal hModule As Integer) As Integer
' Use alias to avoid conflicts with user programs.

Sub DialogFont (CD As Control, FSP As Integer)

    ' FSP - Fonts for Screen printer, screen or both
    '       0 = both
    '       1 = Screen only
    '       2 = Printer only
    ' Select fonts common to both printer and screen.

Const CF_BOTH = &H3&
Const CF_EFFECTS = &H100&
Const CF_FORCEFONTEXIST = &H10000
Const CF_PRINTERFONTS = &H2&
Const CF_SCALABLEONLY = &H20000
Const CF_SCREENFONTS = &H1&
Const CF_WYSIWYG = &H8000&

    On Error Resume Next
    CD.CancelError = True
    CD.Flags = CF_FORCEFONTEXIST Or CF_ANSIONLY Or CF_EFFECTS

    Select Case FSP
    Case 0
        CD.Flags = CD.Flags Or CF_WYSIWYG Or CF_BOTH Or CF_SCALABLEONLY
    Case 1
        CD.Flags = CD.Flags Or CF_SCREENFONTS
    Case Else
        CD.Flags = CD.Flags Or CF_PRINTERFONTS
    End Select

    CD.Action = 4

    ' Err means cancel.

End Sub

Sub DialogPrinterSetup (CD As Control)

Const PD_PRINTSETUP = &H40&

    On Error Resume Next
    CD.CancelError = True
    CD.Flags = PD_PRINTSETUP
    CD.PrinterDefault = True
    CD.Action = 5

    ' If Err, then cancel was selected.

End Sub

Sub DocClose ()
    ' Close the document.
    If VPF = 0 Then Exit Sub
    Close #VPF
    VPF = 0
End Sub

Sub DocFinish (ByVal Title As String)
    On Error Resume Next
    ' Fill in document to even blocking factor.
    ' These unused records have CY = -1.
    VP.CY = -1
    While (VPRec Mod (Len(VPCounter) / Len(VP)))
        VPRec = VPRec + 1
        Put #VPF, VPRec, VP
    Wend
    DocClose

          ' Open document and set counter record.
    If CurY = 0 And VPCounter.Pages > 1 Then
          ' in case we stopped at top of new page
        VPCounter.Pages = VPCounter.Pages - 1
    End If
    ' Set height and width of last page.
    If CurY Then VPCounter.VPHeight(VPCounter.Pages) = CurY
    If VPHeight Then VPCounter.VPHeight(VPCounter.Pages) = VPHeight
       If PageHeight Then VPCounter.VPHeight(VPCounter.Pages) = PageHeight
         VPCounter.Width = Printer.Width
         ' Set title.
         VPCounter.Title = Title
         ' Write out counter record.
         VPF = FreeFile
         Open DocFile For Random As #VPF Len = Len(VPCounter)
         VPRec = (LOF(VPF) \ Len(VPCounter))
         VPRec = VPRec + 1
         Put #VPF, VPRec, VPCounter
         DocClose
End Sub

Sub DocKill ()
    ' kills all leftover temp VP files
    On Error Resume Next
    A$ = VPTempFile()
    L% = InStr(1, A$, "VP")
    A$ = Mid$(A$, 1, L% + 1)
    S$ = Dir$(A$ + "*.TMP")
    L% = InStr(1, A$, "~")
    A$ = Mid$(A$, 1, L% - 1)
    While S$ <> ""
        Kill A$ + S$
        S$ = Dir$
    Wend
End Sub

Sub DocNew (File)
    DocClose        ' Be sure it is not already open.
    DocFile = File  ' User may specify. If not specified, assign a temp file.
    If DocFile = "" Then DocFile = VPTempFile()
    If Dir$(DocFile) <> "" Then Kill DocFile
    VPF = FreeFile
    Open DocFile For Random As #VPF Len = Len(VP)
    ' Initialize and set defaults.
    VPRec = 0
    VPCounter.Pages = 1
    VPCounter.FromRec(VPCounter.Pages) = 1
    VPCounter.ToRec(VPCounter.Pages) = 1
    CurY = 0
    VP.CY = 0
    VP.LF = True
    FormFeed = True
    VPCancel = False    ' 1.1
End Sub

Sub DocOpen ()
    DocClose
    If Dir$(DocFile) = "" Then Exit Sub
    ' Open and read counter - then close.
    VPF = FreeFile
    Open DocFile For Random As #VPF Len = Len(VPCounter)
    VPRec = LOF(VPF) \ Len(VPCounter)
    Get #VPF, VPRec, VPCounter
    Close #VPF
    ' Open as regular size.
    VPF = FreeFile
    Open DocFile For Random As #VPF Len = Len(VP)
End Sub

Sub PutVP ()
Dim ErrTrap As Integer

    On Error Resume Next

    If MeasureForScreen Then
        If MainForm!PicVP.FontName <> VP.FN Then MainForm!PicVP.FontName =
         Trim(VP.FN)
        If MainForm!PicVP.FontSize <> VP.FS Then MainForm!PicVP.FontSize = VP.FS
        If MainForm!PicVP.FontBold <> VP.FB Then MainForm!PicVP.FontBold = VP.FB
        If MainForm!PicVP.FontUnderLine <> VP.FU Then
           MainForm!PicVP.FontUnderLine = VP.FU
        If MainForm!PicVP.FontItalic <> VP.FI Then
           MainForm!PicVP.FontItalic = VP.FI
        TH% = MainForm!PicVP.TextHeight("A")
    Else
        If Printer.FontName <> Trim(VP.FN) Then Printer.FontName = Trim(VP.FN)
        If Printer.FontSize <> VP.FS Then Printer.FontSize = VP.FS
        If Printer.FontBold <> VP.FB Then Printer.FontBold = VP.FB
        If Printer.FontUnderline <> VP.FU Then Printer.FontUnderline = VP.FU
        If Printer.FontItalic <> VP.FI Then Printer.FontItalic = VP.FI
        TH% = Printer.TextHeight("A")
    End If

    If VP.LF Then
        ' Linefeed means add to CurY.
        If CurY = 0 And VP.CY Then CurY = VP.CY
        CurY = CurY + TH%
    End If

    If VPHeight And FormFeed Then
        ' If print reaches bottom margin then make new page.
        ' Note: Multicolumn reports should keep track of the bottom margin
        ' separately and set FormFeed = False.
        If CurY + TH% >= VPHeight Then
            VP.NP = True
        End If
    End If

    VPRec = VPRec + 1
    Put #VPF, VPRec, VP

    VPCounter.ToRec(VPCounter.Pages) = VPRec

    If Dbug Then Debug.Print Trim(VP.Text)

    If VP.NP Then
        VPCounter.VPHeight(VPCounter.Pages) = CurY
        If VPHeight Then VPCounter.VPHeight(VPCounter.Pages) = VPHeight
        If PageHeight Then VPCounter.VPHeight(VPCounter.Pages) = PageHeight
        ' Increment page and set defaults.
        VPCounter.Pages = VPCounter.Pages + 1
        VPCounter.FromRec(VPCounter.Pages) = VPRec + 1
        VPCounter.ToRec(VPCounter.Pages) = VPRec + 1
        VP.NP = 0
        CurY = 0
    End If
    ' Reset defaults.
    VP.LF = True
    VP.CY = 0
    VP.Text = Space$(132)
    S$ = Space$(132)
End Sub

Sub VPRun ()
    If Err + VPCancel Then
        If Dir$(DocFile) <> "" Then Kill DocFile
        VPCancel = False
    Else
        ' If program is not in \Windows then use this:
        ' X% = Shell(App.Path + "\VP.Exe " + DocFile, 1)

        ' If program is in \Windows Then use this:
        X% = Shell("VP.Exe " + DocFile, 1)

        If VPWait Then WaitFor X%

    End If
End Sub

Function VPTempFile () As String
    S$ = Space$(144)
    X% = VPTemp(0, "VP", 0, S$)
    L% = InStr(1, S$, Chr(0))
    If L% Then S$ = Trim(Mid$(S$, 1, L% - 1))
    VPTempFile = S$
End Function

Sub WaitFor (X%)
    While WaitForVP(X%)
        DoEvents
    Wend
    VPWait = False
End Sub
?End Listing 1?
Listing 2. VP.FRM
Dim I As Integer
Dim Zoom As Integer
Dim CurrentPage As Integer

' API routines
Declare Sub ShowWindow Lib "User" (ByVal hWnd As Integer, ByVal nCmdShow As
 Integer)
Declare Function SetStretchBltMode Lib "GDI" (ByVal hDC As Integer, ByVal
 nStretchMode As Integer) As Integer
Declare Function StretchBlt% Lib "GDI" (ByVal hDC%, ByVal X%, ByVal Y%, ByVal
 nWidth%, ByVal nHeight%, ByVal hSrcDC%, ByVal XSrc%, ByVal YSrc%, ByVal
 nSrcWidth%, ByVal nSrcHeight%, ByVal dwRop&)

' by Mike Foley
' (813) 461-9382
' 1811 Apache Trail
' Clearwater, Fl 34615

Sub CommandCopy_Click ()
    Idle.SetFocus
    MousePointer = 11
    DoEvents
    ' Copy display to clipboard.
    If Not Zoom Then
     ClipBoard.SetData PicVP.Image, 2
    Else
     ClipBoard.SetData PicS.Image, 2
    End If
    MousePointer = 0
End Sub

Sub CommandEnabled (TF As Integer)
    For I = 0 To Controls.Count - 1
     If TypeOf Controls(I) Is SSCommand Then
        If InStr(1, Controls(I).Caption, "&") Then
         Controls(I).Enabled = TF
        End If
     End If
    Next I
    LP.Enabled = TF
    If TF And VPCounter.Pages < 2 Then TF = False
    For I = 0 To 3
     PageButton(I).Enabled = TF
    Next I
End Sub

Sub CommandExit_Click ()
    Unload Me
End Sub

Sub CommandPrint_Click ()
    Idle.SetFocus
    On Error Resume Next
    CD.Min = 1
    CD.Max = VPCounter.Pages
    DialogPrint
    If Err Then Exit Sub
    MousePointer = 11
    CommandEnabled False
    DoEvents
    S$ = DocFile + "," + Format$(CD.Copies) + "," + Format$(CD.FromPage) + "," +
     Format$(CD.ToPage)
    X% = Shell(App.Path + "\VP_Print.Exe " + S$, 1)
    WaitFor X%
    CommandEnabled True
    Idle.SetFocus
    MousePointer = 0
End Sub

Sub CommandSetup_Click ()
    Idle.SetFocus
    DialogPrinterSetup CD
    If Err Then Exit Sub
    PicSize
End Sub

Sub CommandZoom_Click ()
    Idle.SetFocus
    MousePointer = 11
    CommandZoom.Enabled = False
    DoEvents
    On Error Resume Next
    HScroll1.Value = 1
    VScroll1.Value = 1
    If Not PicS.Visible Then
     PicVP.Visible = False
     VScroll1.Visible = False
     HScroll1.Visible = False
     PicParent.Height = ScaleHeight - Panel.Height
     PicParent.Width = ScaleWidth
     PicS.Top = 20
     PicS.Height = PicParent.Height - 40
     PicS.Width = (PicS.Height * PicVP.Width) \ PicVP.Height
     PicS.Left = (PicParent.Width - PicS.Width) / 2
     Stretch PicVP, PicS, 1
     PicS.Visible = True
     Zoom = True
    Else
     PicParent.Height = ScaleHeight - PicParent.Top - HScroll1.Height
     PicParent.Width = ScaleWidth - VScroll1.Width
     VScroll1.Visible = True
     HScroll1.Visible = True
     DoEvents
     PicS.Visible = False
     PicVP.Visible = True
     Zoom = False
    End If
    CommandZoom.Enabled = True
    MousePointer = 0
End Sub

Sub DialogPrint ()

Const PD_ALLPAGES = &H0&
Const PD_HIDEPRINTTOFILE = &H100000

    On Error Resume Next
    CD.CancelError = True
    CD.Min = 1
    If CD.Max < 1 Then CD.Max = 1
    CD.FromPage = CD.Min
    CD.ToPage = CD.Max
    CD.Flags = PD_ALLPAGES Or PD_HIDEPRINTTOFILE
    CD.PrinterDefault = True
    CD.Action = 5
    If CD.FromPage < 1 Then CD.FromPage = 1
    If CD.ToPage < CD.FromPage Then CD.ToPage = CD.FromPage

    ' Calling program uses these:
    '   CD.Copies
    '   CD.FromPage
    '   CD.ToPage

    ' If Err, then cancel was selected.

End Sub

Sub DocLoad ()
    Idle.SetFocus
    MousePointer = 11
    DoEvents
    DocOpen
    Caption = Trim(VPCounter.Title)
    VPPrint 1
    MousePointer = 0
    LPSet
    Beep
    CommandEnabled True
End Sub

Sub Form_Load ()
    If Command$ = "" Then
     End
     Exit Sub
    End If
    DocFile = Command$
    If Dir$(DocFile) = "" Then
     End
     Exit Sub
    End If
    Set MainForm = Me
    FormSetup
    Show
    DocLoad
    WinToTop
End Sub

Sub Form_Resize ()
    On Error Resume Next
    PicParent.Top = Panel.Height
    PicParent.Left = 0
    PicParent.Width = ScaleWidth - VScroll1.Width
    PicParent.Height = ScaleHeight - PicParent.Top - HScroll1.Height
    VScroll1.Top = PicParent.Top
    VScroll1.Left = ScaleWidth - VScroll1.Width
    VScroll1.Height = PicParent.Height
    HScroll1.Left = 0
    HScroll1.Top = PicParent.Top + PicParent.Height
    HScroll1.Width = ScaleWidth - VScroll1.Width
    PicVP.Top = 0
    PicVP.Left = 0
    SetScrollBars
End Sub

Sub Form_Unload (Cancel As Integer)
    DocClose
    Ini 1
    If DocFile <> "" Then
     If Dir$(DocFile) <> "" Then Kill DocFile
    End If
    End
End Sub

Sub FormSetup ()
    Idle.Left = -Idle.Width ' Move button off screen.
    LP.Caption = VPVersion
    PicParent.BorderStyle = 0
    IniFile = App.Path + "\" + App.EXEName + ".Ini"
    Ini 0
    If App.PrevInstance Then
     Top = Top + 500
     Left = Left + 500
    End If
    If Top + Height > Screen.Height Then
     Height = Screen.Height - Top
    End If
    If Left + Width > Screen.Width Then
     Width = Screen.Width - Left
    End If
    PicSize
End Sub

Sub HScroll1_Change ()
    PicVP.Left = -HScroll1.Value
End Sub

Sub Ini (RW As Integer)
    ' Store and retrieve window position.
    Appname$ = "VP"
    If RW Then
     ' Read
     If WindowState = 0 Then
         Wpps Appname$, "Top", LTrim$(Str$(Top))
         Wpps Appname$, "Left", LTrim$(Str$(Left))
         Wpps Appname$, "Height", LTrim$(Str$(Height))
         Wpps Appname$, "Width", LTrim$(Str$(Width))
     End If
    Else
     ' Write
     Top = Gppi(Appname$, "Top", 1000)
     Left = Gppi(Appname$, "Left", 1000)
     Height = Gppi(Appname$, "Height", Screen.Height / 2)
     Width = Gppi(Appname$, "Width", Screen.Width / 2)
     If Top < 0 Then Top = 0
     If Left < 0 Then Left = 0
     If Top + Height > Screen.Height Then Top = Screen.Height - Height
     If Left + Width > Screen.Width Then Left = Screen.Width - Width
    End If
End Sub

Sub LoadPage (PageNumber As Integer)
    If PageNumber < 1 Or PageNumber > VPCounter.Pages Then Exit Sub
    MousePointer = 11
    LP.Visible = False
    CommandEnabled False
    DoEvents
    PicS.Visible = False
    PicVP.Visible = False
    If Not Zoom Then
     VScroll1.Visible = True
     HScroll1.Visible = True
    End If
    VPPrint PageNumber
    LPSet
    If Zoom Then
     CommandZoom_Click
    Else
     PicVP.Visible = True
    End If
    CommandEnabled True
    MousePointer = 0
End Sub

Sub Lp_Click ()
    If VPCounter.Pages < 2 Then Exit Sub
    S$ = Format$(CurrentPage)
    S$ = InputBox$("Pages 1 to " + Format$(VPCounter.Pages) + Chr(13) + Chr(10)+
     "Goto Page Number:", "Page", S$)
    X% = Val(S$)
    If X% = CurrentPage Then X% = 0
    If X% < 1 Or X% > VPCounter.Pages Then Exit Sub
    LoadPage X%
End Sub

Sub LPSet ()
    LP = "Page " + Format$(CurrentPage) + " of " + Format$(VPCounter.Pages)
    LP.Visible = True
    SetScrollBars
    DoEvents
End Sub

Sub PageButton_Click (Index As Integer)
    Idle.SetFocus
    Select Case Index
    Case 0
     If CurrentPage > 1 Then LoadPage 1
    Case 1
     If CurrentPage > 1 Then LoadPage CurrentPage - 1
    Case 2
     If CurrentPage < VPCounter.Pages Then LoadPage CurrentPage + 1
    Case 3
     If CurrentPage < VPCounter.Pages Then LoadPage VPCounter.Pages
    End Select
End Sub

Sub Panel_DblClick ()
    If InStr(1, LP.Caption, VPVersion) = 0 Then
     LP = LP + VPVersion
    End If
End Sub

Sub PicS_DblClick ()
    CommandZoom_Click
End Sub

Sub PicSize ()
    PicVP.Height = Printer.Height
    PicVP.Width = Printer.Width
End Sub

Sub SetScrollBars ()
    If Zoom Then Exit Sub
    On Error Resume Next
    VScroll1.Max = PicVP.Height - PicParent.Height
    HScroll1.Max = PicVP.Width - PicParent.Width
    VScroll1.LargeChange = VScroll1.Height - PicVP.TextHeight("A")
    HScroll1.LargeChange = HScroll1.Width
End Sub

Sub Stretch (Src As Control, Dst As Control, StretchMode%)
    ' Stretch pictures.
Dim HoldSrcMode As Integer, HoldDstMode As Integer
Const SRCCOPY = &HCC0020

    HoldSrcMode = Src.ScaleMode
    HoldDstMode = Dst.ScaleMode

    Src.ScaleMode = 3
    Dst.ScaleMode = 3

    XSrc% = 0: YSrc% = 0
    nSrcWidth% = Src.ScaleWidth
    nSrcHeight% = Src.ScaleHeight

    XDest% = 0: YDest% = 0
    nDestWidth% = Dst.ScaleWidth
    nDestHeight% = Dst.ScaleHeight

    dwRop& = SRCCOPY
    hSrcDC% = Src.hDC
    hDestDC% = Dst.hDC

    X% = SetStretchBltMode(hDestDC%, StretchMode%)
    X% = StretchBlt(hDestDC%, XDest%, YDest%, nDestWidth%, nDestHeight%,
     hSrcDC%, XSrc%, YSrc%, nSrcWidth%, nSrcHeight%, dwRop&)

    Src.ScaleMode = HoldSrcMode
    Dst.ScaleMode = HoldDstMode
End Sub

Sub VPPrint (PageNumber As Integer)
    ' Print to picture box.
    On Error Resume Next
    PicVP.Cls
    PicVP.Height = VPCounter.VPHeight(PageNumber)
    PicVP.Width = VPCounter.Width
    CurrentPage = PageNumber
    DoEvents
    For VPRec = VPCounter.FromRec(PageNumber) To VPCounter.ToRec(PageNumber)
     Get #VPF, VPRec, VP
     If VP.CY > -1 Then
         If VP.CY Then PicVP.CurrentY = VP.CY
         PicVP.CurrentX = VP.CX
         S$ = Trim(VP.FN)
         If Trim(S$) <> "" Then PicVP.FontName = S$
         PicVP.FontSize = VP.FS
         PicVP.FontBold = VP.FB
         PicVP.FontUnderline = VP.FU
         PicVP.FontItalic = VP.FI
         PicVP.Print RTrim(VP.Text);
         If VP.LF Then PicVP.Print
         Pass% = Pass% + 1
         If Pass% = 10 Then DoEvents: Pass% = 0
     End If
    Next VPRec
    If PicVP.Height < PicVP.CurrentY Then PicVP.Height = PicVP.CurrentY
End Sub

Sub VScroll1_Change ()
    PicVP.Top = -VScroll1.Value
End Sub

Sub WinToTop ()
    ' Puts a window on top.
Const SW_SHOWNA = 8
    ShowWindow Me.hWnd, SW_SHOWNA
End Sub
?End Listing 2?
Listing 3. VP.BAS
' global variables
Global IniFile As String

' API routines
Declare Function GetPrivateProfileInt Lib "Kernel" (ByVal lpApTlicationName As
 String, ByVal lpKeyName As String, ByVal nDefault As Integer, ByVal lpFileName
 As String) As Integer
Declare Function GetPrivateProfileString Lib "Kernel" (ByVal lpApTlicationName
 As String, ByVal lpKeyName As String, ByVal lpDefault As String, ByVal
 lpReturnedString As String, ByVal nSize As Integer, ByVal lpFileName As String)
 As Integer
Declare Function WritePrivateProfileString Lib "Kernel" (ByVal lpApTlicationName
 As String, ByVal lpKeyName As String, ByVal lpString As String, ByVal
 lTlFileName As String) As Integer

Function Gppi (AppName$, Keyname$, Default%) As Variant
    ' Get private profile integer.
    Gppi = GetPrivateProfileInt(AppName$, Keyname$, Default%, IniFile)
End Function

Function Gpps (AppName$, Keyname$, S$, Size%) As Variant
    ' Get private profile String.
    A$ = Space$(Size%)
    X% = GetPrivateProfileString(AppName$, Keyname$, S$, A$, Size%, IniFile)
    Gpps = Left$(A$, InStr(A$, Chr(0)) - 1)
End Function

Sub Wpps (AppName$, Keyname$, ByVal S$)
    X% = WritePrivateProfileString(AppName$, Keyname$, S$, IniFile)
End Sub
?End Listing 3?
Listing 4. VP_PRINT.FRM
Dim Copy As Integer
Dim Copies As Integer
Dim FromPage As Integer
Dim ToPage As Integer
Dim Page As Integer

Declare Sub SetWindowPos Lib "User" (ByVal hWnd%, ByVal hWndinsertAftr%, ByVal
 X%, ByVal Y%, ByVal CX%, ByVal CY%, ByVal wFlags%)
Declare Function AbortDoc Lib "GDI" (ByVal hDC As Integer) As Integer

Sub CommandCancel_Click ()
    VPCancel = True
End Sub

Sub Form_Load ()
    If Command$ = "" Then End
    Set MainForm = Me
    FormSetup
    ' Send in Command$ with Filename, Copies, FromPage, ToPage.
    S$ = Command$
    L% = InStr(1, S$, ",")
    DocFile = Left$(S$, L% - 1)
    S$ = Mid$(S$, L% + 1, Len(S$))
    L% = InStr(1, S$, ",")
    Copies = Int(Left(S$, L% - 1))
    S$ = Mid$(S$, L% + 1, Len(S$))
    L% = InStr(1, S$, ",")
    FromPage = Int(Mid(S$, 1, L% - 1))
    ToPage = Int(Mid(S$, L% + 1, Len(S$)))

    DocOpen
    If VPF = 0 Then
        End
        Exit Sub
    End If
    Caption = Trim(VPCounter.Title)
    Show
    WindowFloat
    DoEvents
    On Error Resume Next
    For Copy = 1 To Copies
        Page = FromPage - 1
        VPPrint FromPage, ToPage
        If VPCancel Then
            X% = AbortDoc(Printer.hDC)
            Exit For
        End If
    Next Copy
    Printer.EndDoc
    DocClose
    End
End Sub

Sub FormSetup ()
    Panel.Left = 0
    Panel.Width = ScaleWidth
    Label1.Left = 0
    Label1.Width = ScaleWidth
    Label1.BackColor = BackColor
    Label1.Caption = ""
    CommandCancel.Left = (ScaleWidth - CommandCancel.Width) \ 2
    Top = (Screen.Height - Height) \ 2
    Left = (Screen.Width - Width) \ 2
End Sub

Sub LabelDisplay ()
    Page = Page + 1
    Label1.Caption = "Page " + Format$(Page)
    DoEvents
End Sub

Sub VPPrint (ByVal FromPage As Integer, ByVal ToPage As Integer)
    ' Print to printer object.
    On Error Resume Next
    LabelDisplay
    For VPRec = VPCounter.FromRec(FromPage) To VPCounter.ToRec(ToPage)
        Get #VPF, VPRec, VP
        If VP.CY > -1 Then
            If VP.CY Then Printer.CurrentY = VP.CY
            Printer.CurrentX = VP.CX
            Printer.FontName = Trim(VP.FN)
            Printer.FontSize = VP.FS
            Printer.FontBold = VP.FB
            Printer.FontUnderline = VP.FU
            Printer.FontItalic = VP.FI
            Printer.Print RTrim(VP.Text);
            If VP.LF Then Printer.Print
            If VP.NP Then
                Printer.NewPage
                If Page < ToPage Then LabelDisplay
            End If
        End If
        DoEvents
        If VPCancel Then Exit For
    Next VPRec
End Sub

Sub WindowFloat ()

    ' Make window float on top.

Const SWP_NOSIZE = &H1
Const SWP_NOMOVE = &H2
Const HWND_TOPMOST = -1

    wFlags% = SWP_NOMOVE Or SWP_NOSIZE
    Call SetWindowPos(Me.hWnd, HWND_TOPMOST, 0, 0, 0, 0, wFlags%)

End Sub
?End Listing 4?
Listing 5. VP_TEST.FRM
' program variables
Dim FSP As Integer      ' font for screen, printer or both
Dim Margin As Integer
Dim SP As Integer       ' screen or printer flag

' local controls for column printing
Const Columns = 3       ' number of columns
Dim Col As Integer      ' current column
Dim TopY As Integer     ' top current y position

Sub CBSet (TF As Integer)

    Frame1.Enabled = Not TF' Command button settings
    CommandCancel.Enabled = TF
    CommandMake.Enabled = Not TF
    CommandSF.Enabled = Not TF
    CommandPF.Enabled = Not TF
    If TF Then
        CommandCancel.SetFocus
        MousePointer = 11
    Else
        MousePointer = 0
    End If
    DoEvents
End Sub

Sub Cdisplay (C As Control, CD As Control)
    If FSP > 1 Then Exit Sub
    ' Display font on command button.
    C.FontName = CD.FontName
    C.FontSize = CD.FontSize
    C.FontBold = CD.FontBold
    C.FontUnderLine = CD.FontUnderLine
    C.FontItalic = CD.FontItalic
End Sub

Sub ColPrint (ByVal Font As String, ByVal Size As Single)
    If Not TextFont(Font) Then Exit Sub
    On Error Resume Next
    ' Check for end of column.
    If MeasureForScreen Then
        H% = PicVP.TextHeight(Font)
    Else
        H% = Printer.TextHeight(Font)
    End If
    If CurY + H% > VPHeight Then
        If Col = Columns Then
            VP.NP = True
            PutVP ' Force page feed.
            VP.CX = Margin
            Col = 1
        Else
            Col = Col + 1
            VP.CX = VP.CX + TPI * 3
        End If
        CurY = TopY
        VP.CY = TopY
    End If
    VP.FN = Font
    VP.FS = Size
    A$ = Format$(Size)
    If InStr(1, Font, A$) Or InStr(1, Font, "cpi") Then A$ = ""
    VP.Text = Trim(VP.FN) + " " + A$
    PutVP
End Sub

Sub Command1_Click ()
    DialogFont CD1, FSP
    If Err = 0 Then Ini 1
End Sub

Sub Command2_Click ()
    DialogFont CD2, FSP
    If Err = 0 Then Ini 1
End Sub

Sub CommandCancel_Click ()
    VPCancel = True
End Sub

Sub CommandMake_Click ()
Dim Page As Integer
    CBSet True
    DocNew ""
    VPHeight = Printer.Height - TPI
    PageHeight = Printer.Height
    MeasureForScreen = False
    FormFeed = False' Turn off form feeds.
    GoSub Hdr1
    Data1.Recordset.MoveFirst
    Do While Not Data1.Recordset.EOF + VPCancel
        VP.FN = CD2.FontName
        VP.FS = CD2.FontSize
        VP.FB = CD2.FontBold
        VP.FU = CD2.FontUnderLine
        VP.FI = CD2.FontItalic
        Pline Data1.Recordset![Company Name]
        Pline Data1.Recordset!Address
        Pline Trim(Data1.Recordset!City) + " " + Trim(Data1.Recordset!State) +
         " " + Data1.Recordset!Zip
        PutVP
        PutVP
        ' There are 5 lines per label.
        ' Check to see if there is room for another label.
        If CurY + (5 * PicVP.TextHeight("A")) >= VPHeight Then
        ' Not enough room - start a new page.
            GoSub NewPge
            GoSub Hdr1
        End If
        DoEvents
        Data1.Recordset.MoveNext
    Loop
    GoSub NewPge
    DocFinish Data1.RecordSource
    Beep
    VPRun
    CBSet False
    Exit Sub

Hdr1:
    CurY = 0
    VP.CY = TPI
    VP.CX = TPI
    VP.FN = CD1.FontName
    VP.FS = CD1.FontSize
    VP.FB = CD1.FontBold
    VP.FU = CD1.FontUnderLine
    VP.FI = CD1.FontItalic
    VP.Text = Data1.RecordSource
    PutVP
    PutVP
    Return

NewPge:
    Page = Page + 1
    VP.Text = "Page " + Format$(Page)
    VP.CY = VPHeight + (2 * PicVP.TextHeight("A"))
    VP.CX = (Printer.Width - Len(Trim(VP.Text))) \ 2
    VP.NP = True
    PutVP
    Return
End Sub

Sub CommandPF_Click ()
    CBSet True
    MeasureForScreen = False
    SP = 1
    FontReportSetup "Printer Fonts / Print to display actual size"
    For I = 0 To Printer.FontCount - 1
        LastWidth% = 0
        For Size = 6 To 16 Step .5
            Printer.FontName = Printer.Fonts(I)
            Printer.FontSize = Size
            W% = Printer.TextWidth("ABCDEF")
            If LastWidth% <> W% Then
                LastWidth% = W%
                ColPrint Printer.FontName, Printer.FontSize
            End If
        Next Size
        DoEvents
        If VPCancel Then Exit For
    Next I
    DocFinish "Printer Fonts"
    Beep
    VPRun
    CBSet False
End Sub

Sub CommandSelect_Click ()
    DialogPrinterSetup CD1
End Sub

Sub CommandSF_Click ()
    CBSet True
    MeasureForScreen = True
    SP = 0
    FontReportSetup "Screen Fonts"
    For I = 0 To Screen.FontCount - 1
        LastWidth% = 0
        For Size = 6 To 16 Step .25
            PicVP.FontName = Screen.Fonts(I)
            PicVP.FontSize = Size
            W% = PicVP.TextWidth("ABCDEF")
            If LastWidth% <> W% Then
                LastWidth% = W%
                ColPrint PicVP.FontName, PicVP.FontSize
            End If
        Next Size
        DoEvents
        If VPCancel Then Exit For
    Next I
    DocFinish "Screen Fonts"
    Beep
    VPRun
    CBSet False
End Sub

Sub FontReportSetup (Title As String)
    DocNew ""
    TopY = TPI * .5
    Margin = TPI * .5
    VPHeight = Printer.Height - TPI
    FormFeed = False    ' Turn off form feeds.
    Col = 1
    VP.CY = TPI * .25
    VP.CX = Margin
    VP.FN = CD1.FontName
    VP.FS = CD1.FontSize
    VP.FB = CD1.FontBold
    VP.FU = CD1.FontUnderLine
    VP.FI = CD1.FontItalic
    VP.Text = Title
    PutVP
    VP.CY = TopY
    VP.CX = Margin
    VP.FB = False
    VP.FU = False
    VP.FI = False
End Sub

Sub Form_Load ()
    Set MainForm = Me
    Inifile = App.Path + "\" + App.EXEName + ".Ini"
    Ini 0
End Sub

Sub Form_Unload (Cancel As Integer)
    Ini 1
End Sub

Sub Ini (RW As Integer)
    AppName$ = "VPTest"
    If RW Then
        ' write
        Wpps AppName$, "Top", Format$(Top)
        Wpps AppName$, "Left", Format$(Left)
        Wpps AppName$, "FSP", Format$(FSP)
        AppName$ = "CD1"
        Wpps AppName$, "FontName", CD1.FontName
        Wpps AppName$, "FontSize", CD1.FontSize
        Wpps AppName$, "FontBold", CD1.FontBold
        Wpps AppName$, "FontUnderLine", CD1.FontUnderLine
        Wpps AppName$, "FontItalic", CD1.FontItalic
        AppName$ = "CD2"
        Wpps AppName$, "FontName", CD2.FontName
        Wpps AppName$, "FontSize", CD2.FontSize
        Wpps AppName$, "FontBold", CD2.FontBold
        Wpps AppName$, "FontUnderLine", CD2.FontUnderLine
        Wpps AppName$, "FontItalic", CD2.FontItalic
    Else
        ' read
        Top = Gppi(AppName$, "Top", 1000)
        Left = Gppi(AppName$, "Left", 1000)
        FSP = Gppi(AppName$, "FSP", 0)
        Option1(FSP).Value = True
        AppName$ = "CD1"
        CD1.FontName = Gpps(AppName$, "FontName", "Courier", 25)
        CD1.FontSize = Gppi(AppName$, "FontSize", 10)
        CD1.FontBold = Gppi(AppName$, "FontBold", False)
        CD1.FontUnderLine = Gppi(AppName$, "FontUnderLine", False)
        CD1.FontItalic = Gppi(AppName$, "FontItalic", False)
        AppName$ = "CD2"
        CD2.FontName = Gpps(AppName$, "FontName", "Courier", 25)
        CD2.FontSize = Gppi(AppName$, "FontSize", 10)
        CD2.FontBold = Gppi(AppName$, "FontBold", False)
        CD2.FontUnderLine = Gppi(AppName$, "FontUnderLine", False)
        CD2.FontItalic = Gppi(AppName$, "FontItalic", False)
    End If
    Cdisplay Command1, CD1
    Cdisplay Command2, CD2
End Sub

Sub Option1_Click (Index As Integer)
    If Option1(Index).Value Then FSP = Index
End Sub

Sub Pline (ByVal Text)
    ' This does the null check and then sends the text into the document file.
    If IsNull(Text) Then Text = ""
    VP.Text = Text
    PutVP
End Sub

Function TextFont (ByVal Font As String)
    If InStr(1, Font, "Fences") Then Exit Function
    If InStr(1, Font, "Symbol") Then Exit Function
    If InStr(1, Font, "Wingdings") Then Exit Function
    If InStr(1, Font, "MT Extra") Then Exit Function
    TextFont = True
End Function
This article is reproduced from the May 1994 issue of Inside Visual Basic for Windows. Copyright ? 1994, The Cobb Group. All rights are reserved. Inside Visual Basic for Windows is an independently produced publication of The Cobb Group. No part of this article may be used or reproduced in any fashion (except in brief quotations used in critical articles and reviews) without prior consent of The Cobb Group.
To contact The Cobb Group, please call (800) 223-8720 or (502) 491-1900.